
Another 7inch tablet with wifi and 3G data capability, named as PICOpad GGD3 model with MTK8389 chipset on it. It’s pretty much the same with PICOpad GGG2 on paper, only this GGD3 use higher resolution screen 1280×800 pixels on 7inch IPS 16:9 wide screen. Here is I build the cwm custom recovery so you can play with custom rom. As you may already knew, using custom recovery will allows you to perform several advanced recovery, restoration, installation and maintenance operations on your Android device that aren’t possible with the stock recovery, and is one of the most common ways used to gain root access, back up device data, install a custom ROMs, kernels, themes, mods and more.
On this model, to inject the cwm recovery we must use spflashtool because we need to resize the recovery partition into a bigger one since the cwm I built is bigger than the stock recovery partition size. We cannot use mobileuncletools, recoverytools or any other recovery writer because we need to resize it first.
OK, here is the cwm + Custom rom in SPFlash Tool file format :
Download : GGD3-4.2.2-jfdesignnet-240214.rar
MD5 : 6207ec3882505f5da66c389920983f86
Please remember, after installing this image you will get the cwm custom recovery and also my 4.2.2 custom rom (pretty much the same with stock os from axioo) except this is a mini version without bloated software apps, you also got root and superuser.
HOW TO INSTALL :
To install this cwm + custom rom, you need SPFlashTool program which only available on winblows os platform so … really sorry, I cannot support it because I never use and don’t have winblows. You may refer to this tutorial : MT65xx Flashing Tutorial it is very well explained by Bruno Martin.
Please be really careful using SPFlashTool, especially when flashing ROM not for your device, since it may bricked your device forever.
HOW TO REBOOT INTO CWM RECOVERY :
To enter the cwm recovery mode is pretty easy on this model, just power off the device until you feel the device vibrate indicating it was totally shutdown. Then, hold down Volume + button then press power button, hold them both until you see axioo logo on screen then release it. Wait a sec or two … then it will show mode lists you can choose : Recovery, Fastboot, Normal Boot, and Normal Boot + Trace. Navigate through the choices using Vol + button and execute it using Vol – button. Of course in this case choose Recovery then you’ll be in recovery mode.
There are also many apk on playstore such as Quickboot, RecoveryTool, … etc, that can do reboot into recovery directly from alive system, use any one you like.
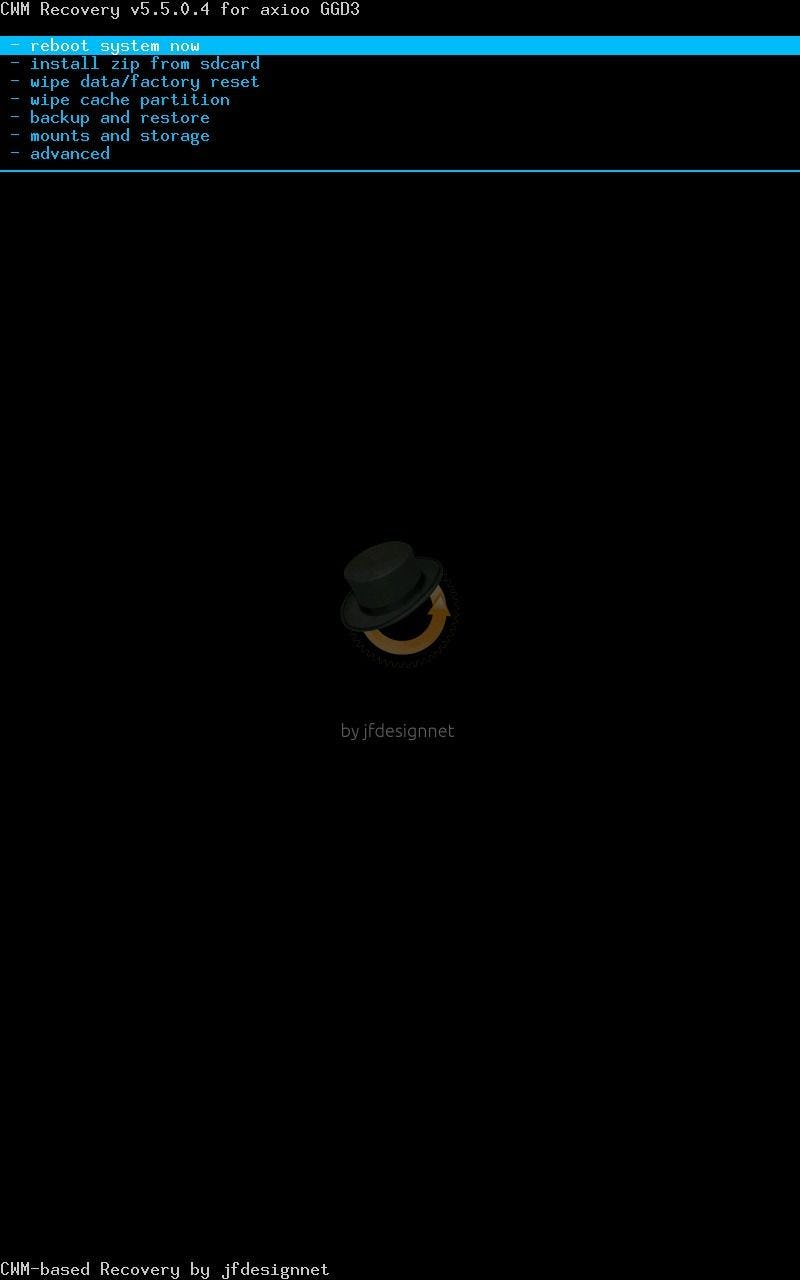
Here is the look if everything goes well :


Some other notes from me :
Why no playstore on the included custom rom ?
if you really interested with my custom rom that included on this cwm + custom rom packed, and you want to use it, be my guest, it’s all yours … but because this custom rom only contain core system without google’s proprietary apps, in other words, there are no playstore and any google framework, you have to install gapps to add it. here below is gapps for jb-4.2.2 :
Gapps : gapps-jb-20130812-signed.zip
MD5 : 5f22f046e37038a3856eeb825e73d4ed
Download and copy it to your ext-sdcard then Install it using cwm. Go into cwm, choose install zip and navigate to the zip file and install it. After finish, choose reboot and all the google’s framework including playstore and g+ will ready to use.
Happy flashing custom roms for your PICOpad GGD3.