
Introduction
Weather station monitor system which is an integrated temperature and air pressure monitoring system based on IoT to monitor temperatures in many rooms or buildings and display all changes in temperature and air pressure in one web page that can be monitored easily from a browser.
Features
- Unlimitted Node sensors using Espressif esp8266 chip series.
- MQTT broker pusblish-subscribe protocol for collecting data from sensors.
- Influxdb time series database, perfect for Internet of Things sensor data and real-time analytics.
- Interactive visualization using Grafana for charts, graphs and alerts using web interface.
- Predefined monitor dashboard for easy startup, and fully extendable, customizable dashboard.
- Node sensors can be configured in place using wifi-manager and supported android application checker.
- Each node sensors have adequately unique node-id from esp-chip-id or user define based on location spot using custom parameter.
- Deep sleep technology sensors for efficiency and battery power save feature.
Details
Temperature monitoring system or temperature / air pressure from the room using esp8266 and raspberrypi. Changes in temperature and air pressure from the monitored room will be collected by the temperature sensor along with the IoT esp8266 chipset and send the results via a wifi network to the raspberrypi server using the mqtt (Message Queuing Telemetry Transport) protocol. Then MQTT broker will send this data string to the influxdb system which is a time-series database. This influxdb source database will then be used by grafana monitor system to produce data on temperature and air pressure changes in a graphic format that is easy to read.
Configuration
All sensor systems, client server transmissions and database processing have been prepared into a ready-made application. Before it can be used, the system needs to be configured first. Configuration steps are divided into 3 parts :
- server configuration
- sensor configuration
- dashboard configuration
1. Server
Download the gweatherstation server firmware image and write it to sdcard (min 8gb) using Etcher or RaspberryPi Imager software. Make sure md5sum is matched before writing to sdcard to avoid unwanted results.
1.1 WiFi configuration
After writing finished, don't unplug the sdcard yet, we need to configure the wifi network so the server can connect to wifi when booting later. For that, open the file manager on Winblows OS, open the sdcard (it's fat32 partition one) and find the file gweatherstation-wifi-config.txt. Open the file and enter the wifi SSID and password you need to connect to the network.
# Gweatherstation wifi setting
# please do not edit this file using winblows notepad, use notepad++ at least

country=ID

network={
    ssid="WIFISSID"
    psk="WIFIPWD"
    key_mgmt=WPA-PSK
}

# ------------ DO NOT edit below this line ------------
ctrl_interface=DIR=/var/run/wpa_supplicant GROUP=netdev
update_config=1
Change the WIFISSID and WIFIPWD to desired value and don't change anything else if you're unsure. WPA-PSK is the most common wifi security data encryption system, consult with network administrators when using AES or WAP2 corporate.
Don't forget to save and then unmount the sdcard gracefully. SDcard is now ready to use.
1.2 Run the server
Boot the sdcard on raspberrypi and wait for the prompt to appear when there is any display attached, or wait for the green led light on raspberrypi to stop flashing when on headless system (approximately a minute to finish boot).
This gweatherstation server has been prepared with the mDNS responder hostname system, so you can access it using only the hostname regardless of the ip. The default hostname is : gweatherstation.local
You can try whether or not your network system supports mDNS responder by trying to access this gweatherstation server by using another computer or your smartphone that connected to the same network. Open any browser and enter the url address : gweatherstation.local:3000
No mDNS support
If you cannot acccesgweatherstation.local:3000, it means your network system does not support mDNS, then there is no other way to access other than through ip, please contact the network administrator to get access to the router DHCP server and see the ip for this gweatherstation server.
Then later you can access the server using ip-addresshttp://<ip-address>:3000. Ex: http://192.168.1.10:3000
If all goes well and you can access the gweatherstation.local:3000 url then the grafana login page will display as follows:

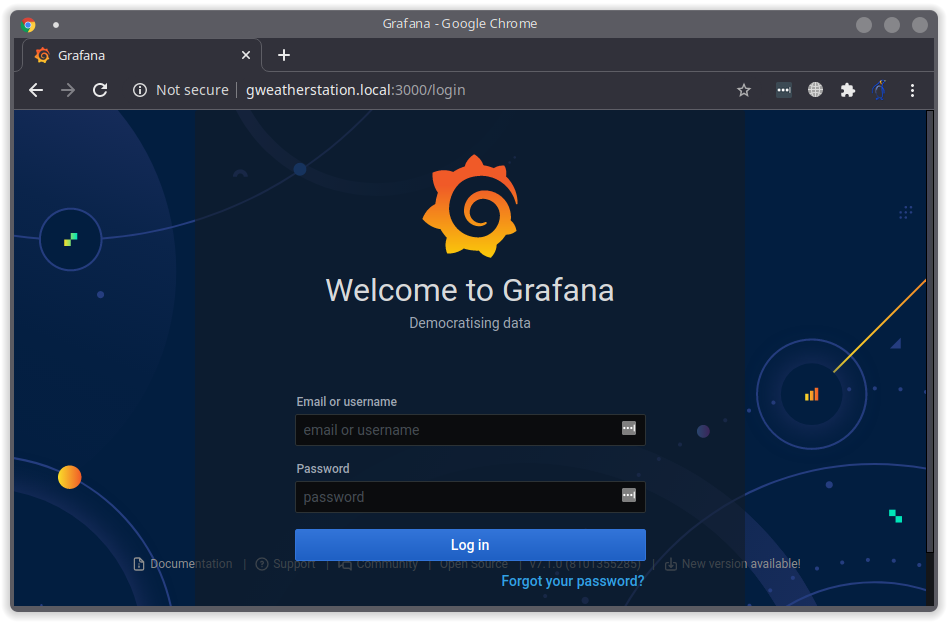
The gweatherstation server configuration process is complete, the system is ready to receive data from the sensor.
2. Node Sensor
To avoid the difficulties of flashing the sensor node firmware, the sensor has been prepared with the firmware that has been embedded therein. Before the sensor can be used, the sensor needs to be connected to the same wifi network system as the gweatherstation server.
2.1 Node sensor configuration
First time powering up this sensor node, then the sensor node will act as AccessPoint. Use your smartphone to connect to this AccessPoint sensor node, and find AccessPoint with the name gws-ns-xxxxx (gws-ns-xxxxx : gws stands for gweatherstation, ns stands for nodesensor and xxxxx is a unique esp chipset id for the sensor node)
Connect to the AccessPoint and the system will redirect to the captive portal page as follows:

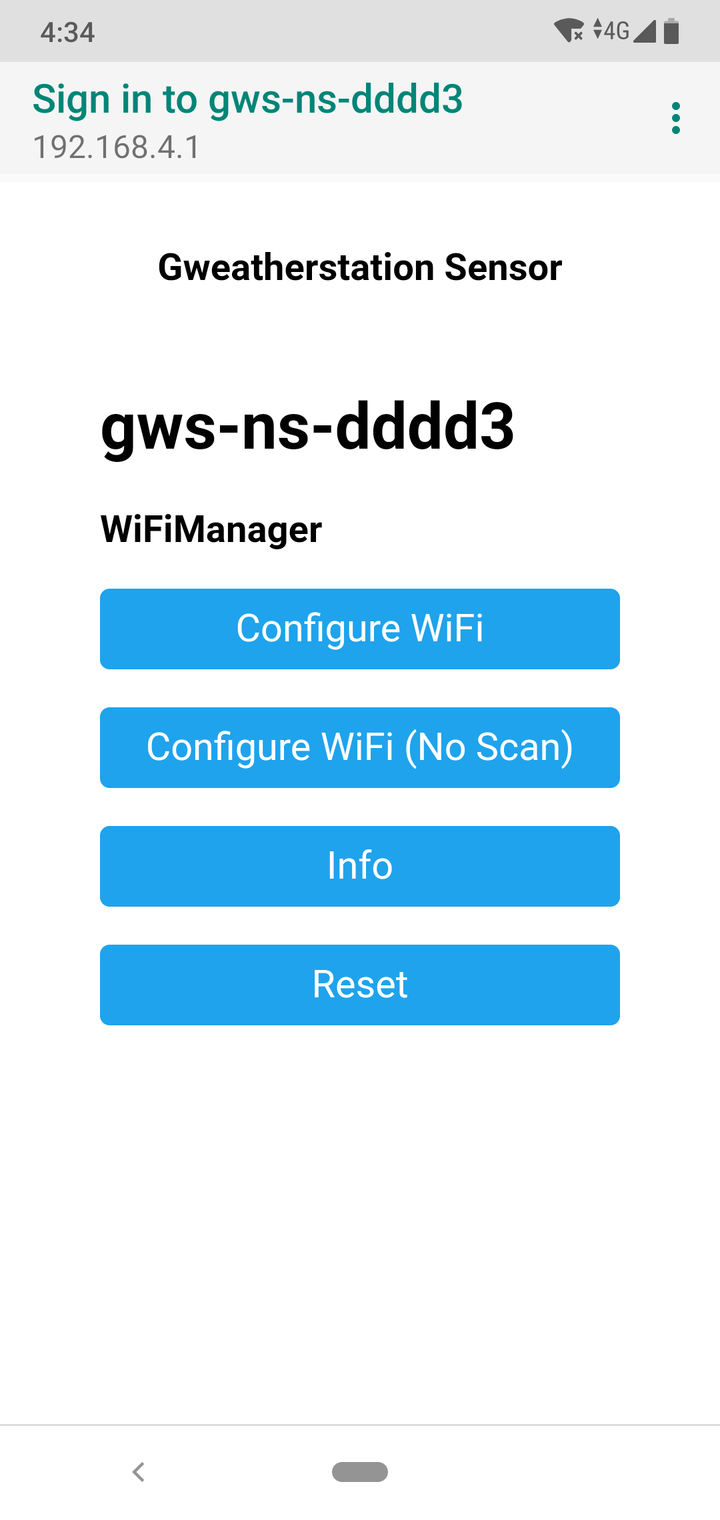
Press the Configure Wifi button for the next step, and the sensor node will scan from nearby AccessPoint wifi like this :
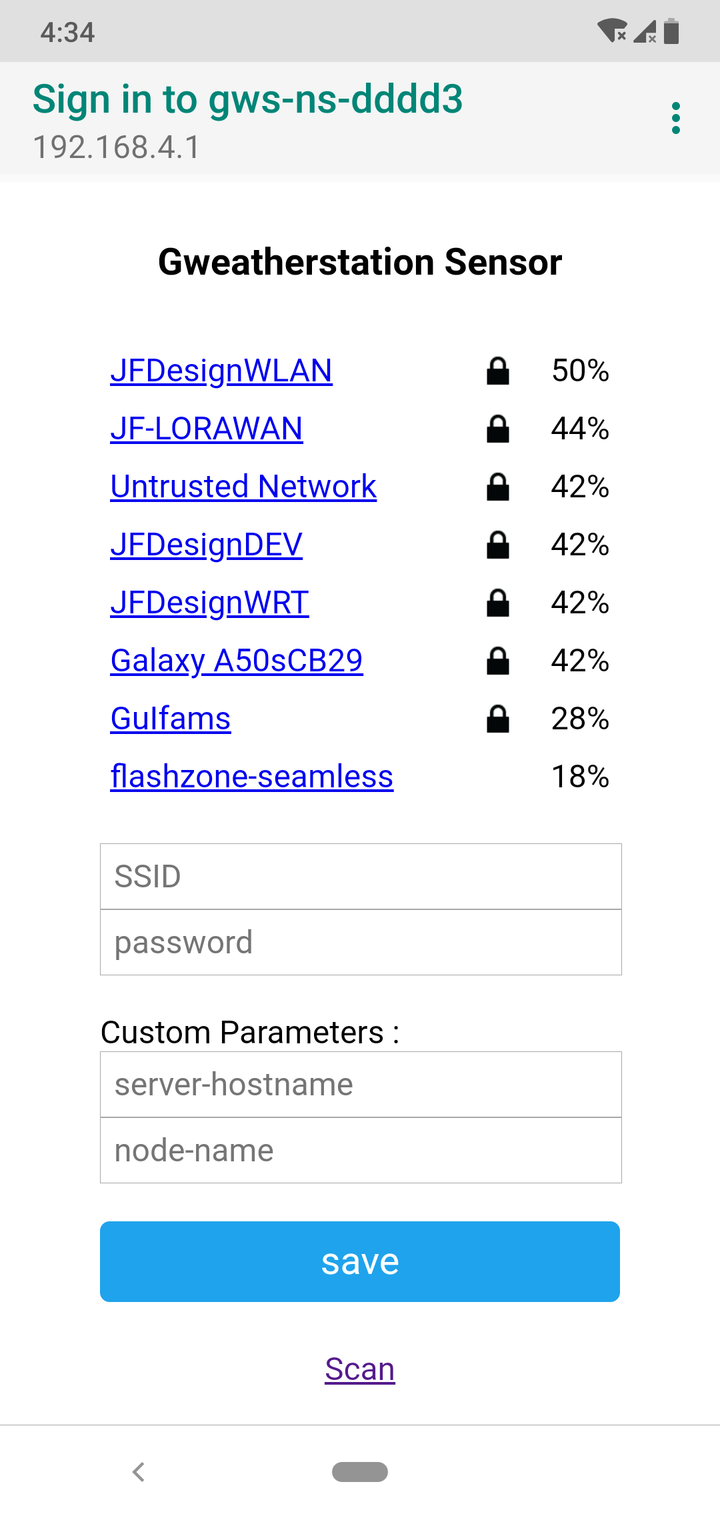
Select the desired AccessPoint SSID, and enter the password for the SSID underneath it.
For the server-hostname and node-name fields is a custom parameters, explained as below :
server-hostname: is the ip address of the gweatherstation server. If left empty, the default value will be given,gweatherstation.local. Unless your network system does not support mDNS then leave this entry intact.node-name: is the alias name for this sensor node. the alias name here is to make it easier to remember than to use the chipset id. For example,meeting_roomwill be easier to remember and maintain thangws-ns-36cd1.
server-hostname entry info
Such as on any common url or hostname, DO NOT use any space or invalid characters in the name.
node_name entry info
Node name is later use as subscribe topic on MQTT protocol that do not accept any punctuation such as - or space, so DO NOT use any punctuation in the node name. If it is a must, use underscore to replace - or space.
Ex: "meeting_room" is good, "meeting-room" is no no, "meeting room" is a big no no.
node-name custom warning
If the node-name is filled in, then thelocationvariable on grafana dashboard at the server must also be changed using the new node-name in order to receive the data from it.
So, for simplicity sake, if this is the very first time of installation, I prefer not to custom any of this custom parameters and use the default value for trouble free installation. You can always custom later after all system running stable and have visible results.
If everything is ready, press the save button to save the wifi data to the node-sensor non volatile memory, so the next time this node-sensor is turned on, it will use the saved wifi data for the connection.
2.2 Node sensor running and deep sleep
Once after pressing save, the sensor node will change from its previous function as AccessPoint to Wifi Client. The wifi network connection will be connected and the sensor node will immediately send the sensor results to the gweatherstation server.
By design, the power source of this sensor node uses a LiPo battery, to maintain longevity this sensor is prepared with a power saving feature using deep sleep mode.
| Item | Modem-sleep | Light-sleep | Deep-sleep |
|---|---|---|---|
| WiFi | OFF | OFF | OFF |
| System clock | ON | OFF | OFF |
| RTC | ON | ON | ON |
| CPU | ON | Pending | OFF |
| Substrate current | 15 mA | 0.4 mA | ~20 uA |
| Average current (DTIM = 1) | 16.2 mA | 1.8 mA | - |
| Average current (DTIM = 3) | 15.4 mA | 0.9 mA | - |
| Average current (DTIM = 10) | 15.2 mA | 15.2mA | 0.55 mA |
Once this node-sensor has finished sending sensor data to the server, all systems will be turned off, including LEDs, modems, and even CPUs, leaving only the power for the RTC timer for wake up later, which is around 20uA. Ignoring losses on wiring resistance et cetera, I've got 38uA multimeter reading on my try with both of my ready made sensors.
How long this 38uA means for 2500mAh battery ?
This means that the same project will now last on the same battery for … 3.7 years! Of course, this doesn’t take into account the characteristics of the battery, so in reality you will end up with 1-2 years battery life for your project.
Marco Schwartz
Powerbank as power supply Warning
For this very reason of this deep sleep mode that only draws around 20uA during sleep, DO NOT use power bank for testing or on real live scenario, because like in most powerbanks, they have a current sensing circuit which will turn off the output when the current detected is smaller than 200mA. The power bank will disconnect the main supply to the node sensor when entering deep sleep mode and then the node sensor will never be able to wake up again from its sleep.
2.3 Reseting Node sensor configuration
There is time when resetting all the configuration is needed such as change of WiFi networks, change custom node-name parameters or even changing the gweatherstation server address. This can be done easily using Reset hardware button on node sensor.
Press the Reset button twice (not too fast, give a pause about a second between presses) and the blue LED will light up continuously which mean the system is entering Reset mode and acting as AccessPoint again as seen previously on step 2.1 above.
3. Dashboard
Log on to gweatherstation.local:3000 with supplied credentials. On left menu Manage - Dashboard there is a pre-configured gweatherstation-dashboard layout, choose it :

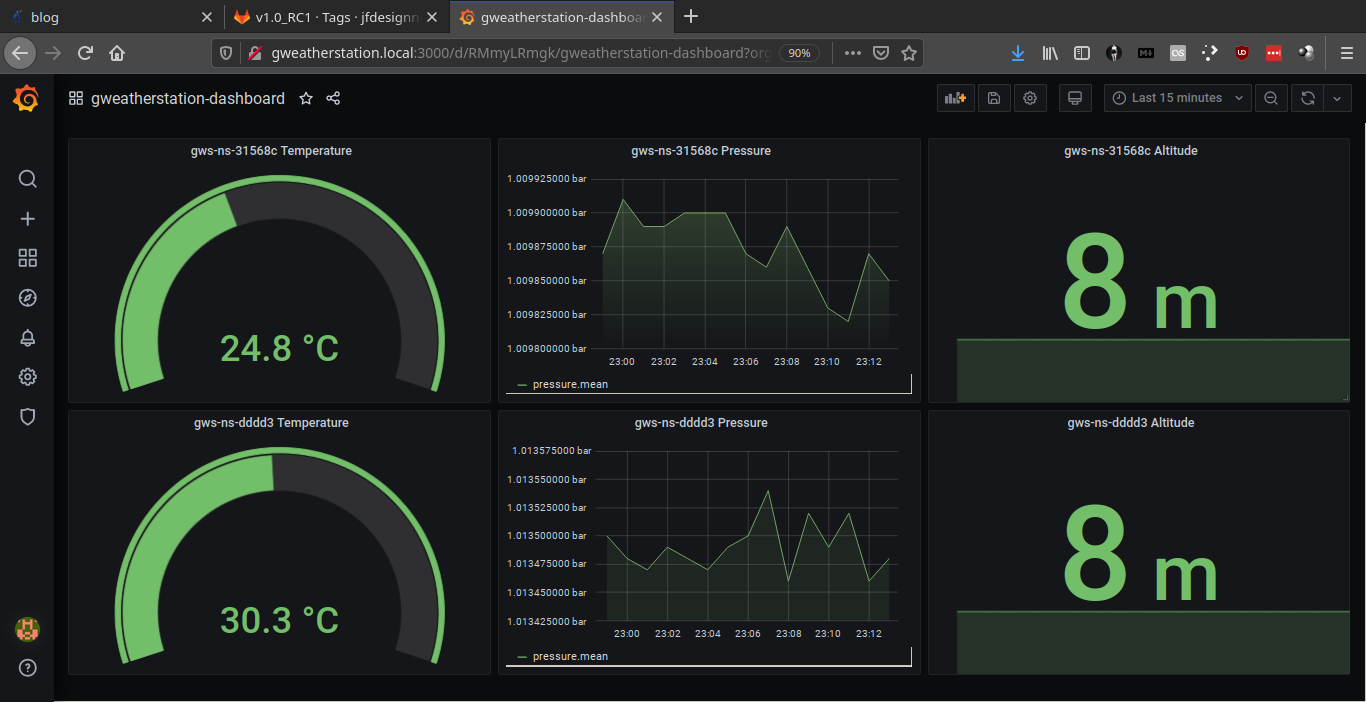
All temperature, air pressure and altitude sensors will be displayed on the browser page.
Each dashboard applet can be reconfigured using the edit menu on the top bar of each applet.
To change the name of the sensor node or node-name, enter the edit menu and change the following query contents:FROM default temperature WHERE location = gws-ns-31568c
be, e.g.FROM default temperature WHERE location = meeting_room
For other controls and customizations, you can refer to Grafana tutorial page
Wrapping up
That's it.
I hope this guide was useful. Thanks for reading!